Tag: wordpress

  • Setting up multiple test sites in XAMPP via virtual sites

    It’s NEVER a good idea to test new designs, programs and/or learn new stuff on a production website. This article describes how to create multiple virtual servers on a Windows 7 platform using XAMPP to create a perfect Linux/Apache like test bed.XAMPP + Win7 = great platform to test WordPress, MovableType and   Drupal

    Some Context

    I’m in the process of re-factoring some websites I’ve let go fallow far too long. Part of this process includes setting up a Linux-like test site on my brand new Windows7-driven Lenovo U350 via XAMPP.

    Yeah, I know, that was a lot all at once, so let’s break some of this down for those of you who don’t code for a living:

    What’s XAMPP?

    The WikiPedia defines XAMPPas follows:

    (pronounced /ˈzæmp/ or /ˈɛks.æmp/[1]) is a free and open source cross-platform web server package, consisting mainly of the Apache HTTP Server, MySQL database, and interpreters for scripts written in the PHP and Perl programming languages …

    … The program is released under the terms of the GNU General Public License and acts as a free web server capable of serving dynamic pages. XAMPP is available for Microsoft Windows, Linux, Solaris, and Mac OS X, and is mainly used for web development projects..

    In short, XAMPP gives me a Linux/LAMP development platform on a Windows based machine.

    My Situation

    Whether it’s learning something for work, or working on a church website, often find myself jumping between languages such as Perl, PHP and Python … and content ‘manglement’ systems such as WordPress, Drupal and MovableType, I find it’s easier to keep things organized if I:

    1. keep each project in its own path
    2. establish a virtual server for each project
    3. enter the project name in the address bar of my browser

    Getting it done

    By default, “localhost” is the default domain name for your PC. It resolves to IP address 127.0.0.1.

    But just as a hosting provider can support several domain names on a single IP address, so too can your Windows system.

    Below are the steps to get this done:

    Step 1 – identify the new host

    Unlike Windows XP or Vista,  for Windows 7 you’ll need to right click on the NotePad program and “Run as Administrator” as pictured below:

    Notepad - Open as Admin

    This is because the file we want to edit is now protected. That file is located at:

    
    C:\Windows\System32\drivers\etc\hosts


    Once you’ve opened the file and on or about line 23, edit your file so it reads:

    
    127.0.0.1       localhost
    127.0.0.1       drupal


    Save it, close your notepad editor, so you don’t shoot yourself in the foot in admin mode.

    Step 2 – establish the virtual host

    Keep in mind, the primary purpose of XAMPP is to give you an Apache server that runs on your local machine.

    That in mind, you’ll need to edit one more file:

    
    notepad C:\xampp\apache\conf\extra\httpd-vhosts.conf


    Once in, you’ll want to modify it so it reads:

    
    NameVirtualHost *:80
    <VirtualHost *:80>
     ServerAdmin postmaster@dummy-host.localhost
     DocumentRoot "C:/xampp/htdocs"
     ServerName localhost:80
     ServerAlias localhost
     ErrorLog "logs/dummy-host.localhost-error.log"
     CustomLog "logs/dummy-host.localhost-access.log" combined
    </VirtualHost>
    <VirtualHost *:80>
     ServerAdmin postmaster@drupal-host.localhost
     DocumentRoot "C:/xampp/htdocs/drupal"
     ServerName drupal:80
     ServerAlias drupal
     ErrorLog "logs/drupal-host.localhost-error.log"
     CustomLog "logs/drupal-host.localhost-access.log" combined
    </VirtualHost>


    Note, in the default XAMPP install, the above is commented out, and the hosts are dummy and dummy2. I simply un-commented everything and renamed dummy2 to drupal.

    Step 3

    Restart your Apache server. The easiest way to do this is stop and start the server through the can be done through the console as pictured below:

    XAMPP Console

    Step 4 – Test It

    Finally, you’ll want to test it by entering “drupal” in the address bar of the browser of your choice.

    Before you do that, you may want to create the directory C:\xampp\htdocs\drupal …

    … and then add an index.html, .php, .pl OR .py file to provide the ubiquitous “Hello World!” to demonstrate everything is running as planned.

    Wrap-up

    Additional Resources

    I’m not the first person to write on this topic, nor will I be the last. That said, here are some other sites that offer similar tutorials in case the one above is still as clear as mud.

    Why Bother?

    Some of you may be wondering why bother at all? Why not just work on your live site.

    Personally, as an IT professional with a couple of decades experience, I can say with utter certainty – backed-up with copious examples – that this is a recipe for disaster.

    Instead, why not simply take an old box and install a Linux distribution such as Ubuntu or Fedora … or do what I did, took a new box an added XAMPP.

    Either way, you’ll be glad you did when one of your tests or learning experiences fries your non-production site.
  • The Facebook Like Button Plugin for WordPress

    Facebook rocked the internet yesterday with 5 new plugins, one of which is an API for the Facebook Like Button. After reading about it and playing a bit with the Facebook’s Like Button generator, I decided what’s needed is a WordPress plugin that allows folks to easily configure the look-and-feel of the Facebook Like Button, and then automatically add it the beginning and/or the end of their posts.

    Update 26-Apr-10

    FYI, I just released version  0.1 of the The Facebook Activity Widget Plugin for WordPress – yet another useful (and different) WordPress plugin for displaying Facebook Social plugins on your website.

    Update 25-Apr-10

    Version 0.4 just got released – it now has a preview feature built into the administrator panel … and I’m starting to get translation .po & .mo files from abroad (thanks!-). It’s also now being distributed via the WordPress Plugin Repository.

    Update 24-Apr-10

    Version 0.2 is released as of Saturday, April 24, 2010 7:14 Eastern Standard Time.

    Also after some excellent email and FB message feedback from some early adopters, you can now also decide whether or not you want the FaceBook Like Button to appear on the top and/or bottom of individual pages, individual posts and/or your front page.

    Installation & Use

    I also wanted to keep it simple, so here’s how it works — using the standard WordPress plugin installation process:

    1. Upload the ‘fblikebutton.zip’ file to the `/wp-content/plugins/` directory using wget, curl of ftp.
    2. ‘unzip’ the ‘fblikebutton.zip’ which will create the folder to the directory `/wp-content/plugins/fblikebutton`
    3. Activate the plugin through the ‘Plugins’ menu in WordPress
    4. Configure the plugin through ‘FBLikeButton’ submenu in the the ‘Settings’ section of the WordPress admin menu.
    5. Modify the fields to choice and save.

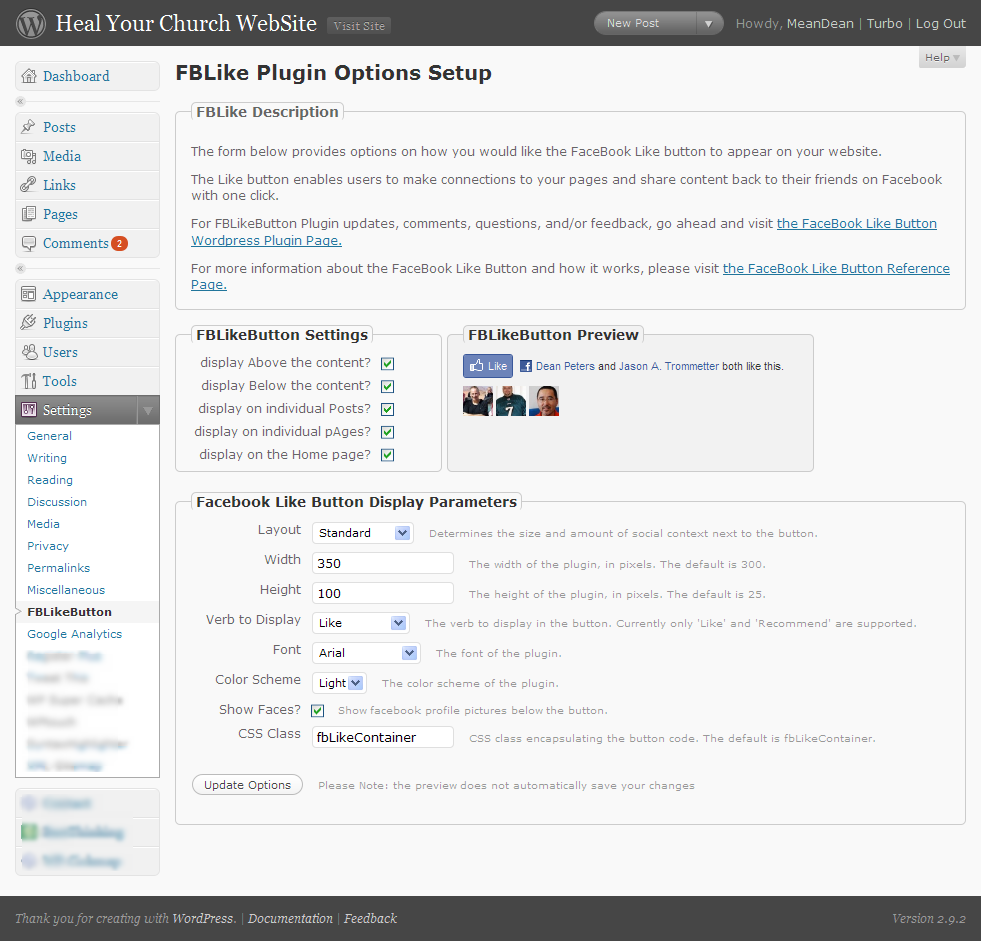
    Here’s a screen shot below of the administrator screen (you’ll want to click on it to see it full size):

    Screenshot of the FBLikeButton Admin Panel - now with preview

    Here’s how the FaceBook Like button appears on the bottom of this post:

    Screenshot of the FBLikeButton after fabulous formatting

    This being being version 0.1, you can bet your sweet bippee there’s more to come. Still, I wanted to get this out to the WordPress community as fast as possible.

    A bit more about the FaceBook Like Button

    What’s nice about the Facebook Like button is that no login to your site is required. Even if you’ve never visited HealYourChurchWebsite.com before, they can get social context starting with their very first visit.

    If you’re logged into FaceBook, then you can see which of your friends like a site — without the site knowing anything about you. Pretty neat, huh?

    Download It

    Also, I’m currently in the process of setting getting established with the WordPress SVN  and everything else that goes with publishing an official WordPress plugin.

    Until then, click here to download the latest fblikebutton, from the WordPress Plugin repository keeping in mind it is version 0.1 0.2 – so expect more to come!

    Download the FaceBook Like Button Plugin for WordPress

    Shout Outs and Thanks

    A shout–out of thanks for the immediate feedback goes out to Benjain, Julien, Tim, Jason, and Dave.

    Additional Reading

    FYI

    Oh, and hey, don’t forget to click the FaceBook Like Button for this post … I’d appreciate it.

  • Spring Cleaning, or time for a HealYourChurchWebsite do-over.

    Time for Heal Your Church Website to upgrade her browsing experience.The birds are singing, the flowers are blooming and WordPress 2.5 has been ‘in the wild’ for a couple of weeks. These factors, and the fact that my own blog is getting a bit crufty has me thinking it is time for yet another Heal Your Church Website do-over. That and I’ve been getting some ‘love notes’ that either fall into the category “how do I get started” or “you reviewed my site, so here is why your blog sucks.” I figure success is the best response, so here’s my initial game plan – thinking out loud as some of you may be in a similar situation of having to freshen up your church and/or charity website.

    1. Research

      I’ve already got a good idea of what I want to say, so mostly in this case I need study what resonates via the results I’ve been collecting via Google Analytics and FeedBurner, including:

      • keywords,
      • popular pages,
      • unusual usages of feeds,
      • any patterns in exit pages,
      • any patterns in entry pages,
      • and any patterns in people navigating into the site.

      I’ll couple this with looking over my error logs to see where people are stumbling the most. I think looking over some of the nicer ‘love notes’ may also be useful as they’re often requests for information I’ve published before.

    2. Plan and ‘objectifry’

      Meaning, based on the research above – along with day-to-day experiences, enumerate a set of requirements and objectives mostly based on needs, though since it is a personal blog, some wants too.

    3. Backup everything

      I need to not only save everything, but also insure I have an effective restoration/rollback plan in the off-chance things go horribly wrong (like I don’t have the right version of PHP or MySQL, etc …).

    4. Re-factor my categories

      Some of these old categories are crufty and unintelligible. They need my healin’ sooner than later and I’m thinking probably better to do it before the upgrade than after – though the new version of WordPress may have some features and/or plug-ins that make such a migration less painful. I’ll have to research that.

    5. Draw out a new template

      First on paper, then later using PhotoShop or PhotoImpact. Don’t get me wrong, I still like the whole Byzantine Cross on the blue domes of Orthodox Churches at Santorini, and may have an opportunity soon to be there – but overall the current theme is beginning to wear. That and it’s just too darn dark.

    6. Upgrade to WordPress 2.5

      Knowing already that this step will likely include the following plugins:

      I already use some of the above, I also know others come ‘bundled’ with the WordPress 2.5 release. Also a word of warning to WordPress “n00bz” – I’ve got a very good idea of what I’m delivering here content-wise, so any and/or all of the selections above are based upon those needs; rather than those ‘neato-keen‘ inspirations.

    7. Update the Theme

      Either generate from scratch and/or adopt and/or modify an existing WordPress theme that is

      • A wider fixed or fluid width
      • Widget ready
      • Has an options page
      • 2 or 3 columns
      • Right sidebar
      • Brighter colors

      I also need to code the theme (or write a plugin) so the last 2 or 3 posts display in full, the next 8 or 10 as excerpts.

    8. Test the site

      • first for functional soundness (technical testing)
      • then to see if it meets my goals/objectives (use cases)
    9. Clean up crufty content

      Go through older articles, eliminating/archiving stuff that’s no longer relevant and cleaning-up some that got hammered by moving from MT 1.0 through 3.0 then to WP 1.5 through to 2.5.

    10. Sit back and enjoy

      Create numerous annoying posts about what pains I suffered executing on the above game plan.

    So here’s your chance kids – got something you’d like to see done differently here? Speak up, now’s your chance.

    Oh and if I get enough love notes and/or comments on this topic, I’ll discuss answers in a fun follow-up post. So be sure to make your notes to me pithy and quotable (and don’t forget the link to your site !-).