Tag: perl

  • What to do when your Twitter Account gets Compromised

    Despite employing strong passwords that I change regularly, despite deleting unsolicited Direct Messages (DM) and mentions with links to unknown destinations, a simple “fat finger faux pas” event lead to me granting a 3rd party Twitter application permission to spam my followers. For that I apologize — and as part of my penance, have provided some useful advice, images and even a script to help you remedy that situation if you should ever similarly fall victim so such malware.What to do when your Twitter account gets hacked

    I woke up a little after 1:30AM last night because I though I had heard some racoons helping themselves to my  trash can as if it were a salad bar. Once that venture into suburban sanitation security was resolved, I checked my Samsung Droid Charge for any incoming notifications.  One that caught my attention read:

    Strange link via DM from you just now.

    As I dug in, I realized that my Twitter Followers were being sent a DM with a link to a third party Twitter Application, which when clicked, would begin the process of similarly turning their Twitter account into a spam-sending zombie.

    First thing first, I read the instructions on Twitter’s help page entitled “My Account Has Been Compromised, ” which advised me to:

    1. Change your password (go ahead, make it  a strong password)
    2. Revoke connections (to any 3rd party application you think suspicious &/or are no longer used)
    3. Update your new password in your trusted third-party applications

    Which I did immediately. I then went into Twitter and began to manually delete the messages the pusilanimous 3rd party program had sent. It wasn’t long into this tedious process that I realized “… this is how I got hacked, the malware link is WAY too close to the delete link.”  I’ve attached a screenshot of a test DM to demonstrate the usability issue I’m trying to describe:
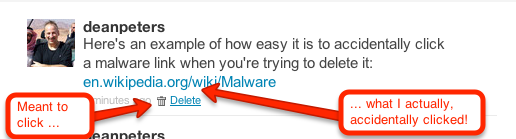
    How the Twitter delete DM links can sometimes be too close to a malware link

    A bit of context, earlier in the evening while watching the 1st quarter of the Packers/Falcon’s game, I received an obvious malware DM. I pulled up Twitter in my browser on my Droid rather than the mobile App because there’s less keystrokes to deleting such conversations. Unfortunately, I clicked the Malware link. I remember that happened because I quickly hit the back key and then deleted — not thinking anything would happen because of my miscue.

    I was wrong. Later, sometime during the 4th quarter while searching stats on the Pack’s stunning 2nd half comeback, I saw on my little Droid browser a page that looked like Twitter, asking me to log back in. I was busy with the game, I’d seen Twitter do this before. What I didn’t see that the link was  actually pointing to a misspelled site: Twittler.com!

    So despite all my talk about strong passwords, ignoring unsolicited candy from strangers, and other such stuff, I granted a 3rd party application permission to spam the h-e-double-toothpicks out of my followers. Worse, just about the time I was through deleting all the rogue messages, I received another communique that reminded me that followers who get email notifications of DMs were still going to see the link.

    So at about 2:45AM, I set out to write a script that would send DM notifications to all my Twitter Friends — technically, those individuals of whom I follow, who also follow me. I won’t go into too much gory detail, other than the resulting replies indicated grateful followers, who while suspicious, were glad to get the personalized Direct Message warning from me.

    I chose PERL, because while other languages may be better for long term projects, I knew I could field a solution within an hour and a half by taking advantage of the Net::Twitter module provided at the CPAN library; along with a fresh set of API consumer and access from the Twitter Developer’s page.

    I call this script “DM_mea_culprit.pl,” and since it can be used to send a bulk messages to all your Twitter followers, please resist temptation and limit its use it for good:

    #!/usr/bin/perl
    #
    # Summary:
    # --------------------------------------------
    # Sends a Direct Message to Friends - those people on Twitter
    # whom I follow who also follow me
    #
    # Arguments:
    # --------------------------------------------
    # none yet, we'll get that done on the next version
    #
    # Example Use:
    # ---------------------------------------------
    # perl DM_mea_culprit.pl > run01.log.txt
    
    use Net::Twitter;
    use Dumper;
    
    # NOTE: you will need to get consumer keys and access tokens from the
    # Twitter Development Center: https://dev.twitter.com/start
    my $nt = Net::Twitter->new(
    traits => [qw/API::REST OAuth/],
    consumer_key => $YOUR_CONSUMER_KEY,
    consumer_secret => $YOUR_CONSUMER_SECRET,
    access_token => $YOUR_ACCESS_TOKEN,
    access_token_secret => $YOUR_ACCESS_TOKEN_SECRET,
    );
    
    # this information is useful to log at the beinning of the script
    # .. it includes how many more messages you can send w/in the hour
    my $ratelimit = $nt->rate_limit_status();
    print Dumper($ratelimit);
    
    # construct the outgoing direct message
    my $omsg = "please do NOT open any URL you may have received from me last night as a DM. It was malware.";
    
    # get all the ID's of people I follow
    my @ids;
    for ( my $cursor = -1, my $r; $cursor; $cursor = $r->{next_cursor} ) {
    # for a larger net, consider followers_ids()
    $r = $nt->friends_ids({ cursor => $cursor });
    push @ids, @{ $r->{ids} };
    }
    
    # walk through all the IDs
    foreach my $id (@ids) {
    if($id) {
    
    # get an array that describes the friendship
    my $friend = $nt->lookup_friendships({ user_id => $id });
    
    # get their screen name
    my $screenname = $friend->[0]->{"screen_name"};
    
    # see how you're connected to this friend
    my $connections = $friend->[0]->{"connections"};
    
    # important -- do they follow you?
    my $isfollowedby = $connections->[1];
    
    if($isfollowedby) {
    my $dmsg = "\@$screenname, $omsg"; # personalize the DM
    my $smsg = $nt->new_direct_message($id, $dmsg); # send the DM
    if($smsg) {
    print "message '$dmsg' successfully sent to #ID".$id."\n";
    } else {
    print "WRN:".$id."\t@".$screenname."\texperienced a message fail\n";
    }
    sleep (2); # don't overrun Twitter
    }
    sleep(3); # don't get blacklisted
    }
    }
    
    # Now send out a generalized message to the peeps;
    my $res = $nt->update({ status => "TO MY FOLLOWERS: $omsg" });
    
    # last bit of logging
    print "This work is done\n";
    exit 1;
    

    All that said,  here are some things I’m doing to do moving forward to avoid such instances.

    1. continue to change my password periodically, using something very strong;
    2. periodically review my third-party application connections, removing anything that looks suspicious and/or is no longer in use;
    3. always use the Twitter Mobile App to delete DMs with bad looking URLs when on my Droid smartphone;
    4. take a harder look at the URL when asked to log back into Twitter (or Facebook for that matter);
    5. perfect the above script — adding logic to delete spammy DM’s while sending out the warning; and
    6. being the Social Media API junkie that I am, perhaps re-write this in Python.

    Please feel free to add your recommendations to the list above — and again — apologies to my Twitter followers for the hassle.

  • Using Perl’s Net::Twitter to Harvest Keyword Searches

    So you’ve decided to dive into social media marketing on behalf of your church and/or charitable organization.

    In fact, you’ve been wisely leveraging bit.ly with Twitter or ow.ly with HootSuite to track and measure your outbound links — but you find yourself in need a more ‘industrial strength‘ means of tracking who is saying what about your organization or an upcoming event.

    You also want to speed up your WordPress blog as it’s been gagging when your Twitter RSS feed goes all 503 on you because Ashton Kutcher tweeted about his toenail clippings.

    Recipe for Success

    As I mentioned in my post last Tuesday entitled ‘Strategy vs. Tactics and your Social Media Activities ,’ I’ve been playing around with some of the cool social networking tools one can find in the CPAN library.

    Today I want to provide a quick snippet on how to use the Net::Twitter to write a simple PERL program to harvest a search.

    To do this, it mean installing the Net::Twitter library. You’ll likely need root or sudo privileges to make this happen. If you don’t know what root or sudo means, then you’ll want to contact your hosting provider.

    That said, once you get it installed, the next step is to go to the Twitter Search page and create an advanced search. From the resulting query string should give you all the parameters you need, for example:

    Based on the above example, I created the following script by using the nano editor for a file called ‘eastertweets.pl‘:

    #!/usr/bin/perl
    use Net::Twitter;
    use Net::Twitter::Search;
    use Scalar::Util 'blessed';
    # Just the Search API; exceptions thrown on error
    $nt = Net::Twitter->new(traits => [qw/API::Search/]);
    eval {
       # Parameters: q, callback, lang, rpp, page, since_id, geocode, show_user
       my $r = $nt->search({
          q=>"\"easter service\" OR \"sunrise service\"",
          lang=>"en",
          geocode=>"35.769804,-78.781622,40mi",
          rpp=>50,
          since=>"2010-03-21"
       });
       for my $status ( @{$r->{results}} ) {
          print "\@$status->{from_user}";
          print "\t$status->{created_at}\n";
          print "\t\t$status->{text}\n";
          print "-----------------------------------------------------\n";
       }
    };
    if ( my $err = $@ ) {
       die $@ unless blessed $err && $err->isa('Net::Twitter::Error');
       warn "HTTP Response Code: ", $err->code, "\n",
       "HTTP Message......: ", $err->message, "\n",
       "Twitter error.....: ", $err->error, "\n";
    }


    Once I created the file, it was simply a matter of modifying it to execute, then calling it:

    chmod a+x eastertweets.pl
    $HOME/eastertweets.pl

    So Why Bother?

    Now this approach by itself is a lot of work for little return. However, here are some things you might want to do with the sample above that would provide some big return value:

    1. feed this into a SQL database history via Perl DBI;
    2. create comma separated values and pipe it into a running log file;
    3. aggregate the returns with other searches into a single RSS file on your server for both the sake of speed and feeding localized dashboards;
    4. grep the returns for other key words, sending email notifications on hot items, while deleting those spammy items that make your feed so noisy;
    5. create a RESTFul web service that dynamically feeds your WordPress blog of select queries using Ajax via jQuery.

    The point is, once the data is captured, you can pretty much do anything you want with it programatically.

    For me, I’m thinking it might be fun to grab user IDs and feed their demographic information into some sort of analytics engine; or at least have some fun with Google Maps.

    Anyway, enjoy the example. If you expand on it, don’t forget to come back and provide a link. I’d be interested to see how this snippet evolves.

  • Setting up multiple test sites in XAMPP via virtual sites

    It’s NEVER a good idea to test new designs, programs and/or learn new stuff on a production website. This article describes how to create multiple virtual servers on a Windows 7 platform using XAMPP to create a perfect Linux/Apache like test bed.XAMPP + Win7 = great platform to test WordPress, MovableType and   Drupal

    Some Context

    I’m in the process of re-factoring some websites I’ve let go fallow far too long. Part of this process includes setting up a Linux-like test site on my brand new Windows7-driven Lenovo U350 via XAMPP.

    Yeah, I know, that was a lot all at once, so let’s break some of this down for those of you who don’t code for a living:

    What’s XAMPP?

    The WikiPedia defines XAMPPas follows:

    (pronounced /ˈzæmp/ or /ˈɛks.æmp/[1]) is a free and open source cross-platform web server package, consisting mainly of the Apache HTTP Server, MySQL database, and interpreters for scripts written in the PHP and Perl programming languages …

    … The program is released under the terms of the GNU General Public License and acts as a free web server capable of serving dynamic pages. XAMPP is available for Microsoft Windows, Linux, Solaris, and Mac OS X, and is mainly used for web development projects..

    In short, XAMPP gives me a Linux/LAMP development platform on a Windows based machine.

    My Situation

    Whether it’s learning something for work, or working on a church website, often find myself jumping between languages such as Perl, PHP and Python … and content ‘manglement’ systems such as WordPress, Drupal and MovableType, I find it’s easier to keep things organized if I:

    1. keep each project in its own path
    2. establish a virtual server for each project
    3. enter the project name in the address bar of my browser

    Getting it done

    By default, “localhost” is the default domain name for your PC. It resolves to IP address 127.0.0.1.

    But just as a hosting provider can support several domain names on a single IP address, so too can your Windows system.

    Below are the steps to get this done:

    Step 1 – identify the new host

    Unlike Windows XP or Vista,  for Windows 7 you’ll need to right click on the NotePad program and “Run as Administrator” as pictured below:

    Notepad - Open as Admin

    This is because the file we want to edit is now protected. That file is located at:

    
    C:\Windows\System32\drivers\etc\hosts


    Once you’ve opened the file and on or about line 23, edit your file so it reads:

    
    127.0.0.1       localhost
    127.0.0.1       drupal


    Save it, close your notepad editor, so you don’t shoot yourself in the foot in admin mode.

    Step 2 – establish the virtual host

    Keep in mind, the primary purpose of XAMPP is to give you an Apache server that runs on your local machine.

    That in mind, you’ll need to edit one more file:

    
    notepad C:\xampp\apache\conf\extra\httpd-vhosts.conf


    Once in, you’ll want to modify it so it reads:

    
    NameVirtualHost *:80
    <VirtualHost *:80>
     ServerAdmin postmaster@dummy-host.localhost
     DocumentRoot "C:/xampp/htdocs"
     ServerName localhost:80
     ServerAlias localhost
     ErrorLog "logs/dummy-host.localhost-error.log"
     CustomLog "logs/dummy-host.localhost-access.log" combined
    </VirtualHost>
    <VirtualHost *:80>
     ServerAdmin postmaster@drupal-host.localhost
     DocumentRoot "C:/xampp/htdocs/drupal"
     ServerName drupal:80
     ServerAlias drupal
     ErrorLog "logs/drupal-host.localhost-error.log"
     CustomLog "logs/drupal-host.localhost-access.log" combined
    </VirtualHost>


    Note, in the default XAMPP install, the above is commented out, and the hosts are dummy and dummy2. I simply un-commented everything and renamed dummy2 to drupal.

    Step 3

    Restart your Apache server. The easiest way to do this is stop and start the server through the can be done through the console as pictured below:

    XAMPP Console

    Step 4 – Test It

    Finally, you’ll want to test it by entering “drupal” in the address bar of the browser of your choice.

    Before you do that, you may want to create the directory C:\xampp\htdocs\drupal …

    … and then add an index.html, .php, .pl OR .py file to provide the ubiquitous “Hello World!” to demonstrate everything is running as planned.

    Wrap-up

    Additional Resources

    I’m not the first person to write on this topic, nor will I be the last. That said, here are some other sites that offer similar tutorials in case the one above is still as clear as mud.

    Why Bother?

    Some of you may be wondering why bother at all? Why not just work on your live site.

    Personally, as an IT professional with a couple of decades experience, I can say with utter certainty – backed-up with copious examples – that this is a recipe for disaster.

    Instead, why not simply take an old box and install a Linux distribution such as Ubuntu or Fedora … or do what I did, took a new box an added XAMPP.

    Either way, you’ll be glad you did when one of your tests or learning experiences fries your non-production site.

  • ip2Country.pl – A fast little script to bulk id IPs by country

    ip2Country.pl - a fast little PERL script to bulk identify IPs by countryYes, I know, all cool programmers use Python these days – but to this old-school programmer, PERL is to my antiquated PC what GWBasic was to first computer at work back in 1983. That is a nice little tool to get things done, like identify a list of IP addresses by country.
    Here’s the situation, I’ve been getting a lot of incoming spambots attempting to create accounts and post comments both here on HYCW and a few other sites I help manage. The Akismet spam filtering service catches all of it – but there’s still at times a huge draw on bandwidth, CPU and other resources when these bots hit.

    So from time to time, I harvest the IP addresses from the thwarted ne’er-do-well’s failed attempts via my user registration table and/or Apache logs and then add them to the firewalls, .htaccess file and/or application IP ban lists of these various sites – except for those IPs incoming from countries where both the languages and laws give me the ability to email the abuse administrator.

    Moreover, by excluding IPs from countries like the US, Canada, etc … from my ‘hit list,’ I don’t accidentally banish entire ISPs such as RoadRunner, ComCast or AOL when one of their user’s machines goes z0mbie goes due to some malware.

    So the trick is then to take all the IPs from all the computers with which I’m associated, and drive the list through a simple application that will generate a list of IPs to ban – while excluding IPs whom I can (and do) contact via email at a later time.

    Which is what inspired me to write ip2Country.pl – a fast little PERL script to bulk identify IPs by countries who don’t have IP abuse administrators who care, and generate a bash script to insert the entries into my apf firewall deny_hosts.rules file:

    #!/usr/bin/perl
    #
    # by Dean Peters
    # http://healyourchurchwebsite.com/
    #
    use IP::Country::Fast;
    use Geography::Countries;
    my $reg = IP::Country::Fast->new();
    
    print "#/bin/sh\n";
    print "# -- append firewall --\n";
    while() {
            chomp;
            my $ip = $_;
            my $ip_cntry_abr = $reg->inet_atocc($ip);
            my $ip_cntry_nam = country $ip_cntry_abr;
            next if ($ip_cntry_abr =~ m/US|CA|GB|AU|NZ/i);
            print "/etc/apf/apf -d $ip {mad spammer from $ip_cntry_nam}\n";
    }
    print "# -- restart firewall --\n";
    print "/etc/apf/apf -r\n";
    
    __DATA__
    121.1.29.246
    121.15.200.148
    193.238.213.70
    196.20.7.74
    210.22.83.146
    217.30.244.226
    222.124.200.212
    

    Oh sure, I could be real fancy and write a version that takes command line arguments for individual IP addresses and/or a file of IP addresses … but the point here was to demonstrate how a crufty old tool like PERL can help bulk identify IPs by countries so you can too add them to your firewalls, .htaccess file and/or application IP ban list.

    That said, if you’ve got a Python or even PHP version of the same, leave a comment and share the goods.

    Or you can just preemptively use the online services of Block a Country and be done with it.

  • How to quickly check your error logs for oddities

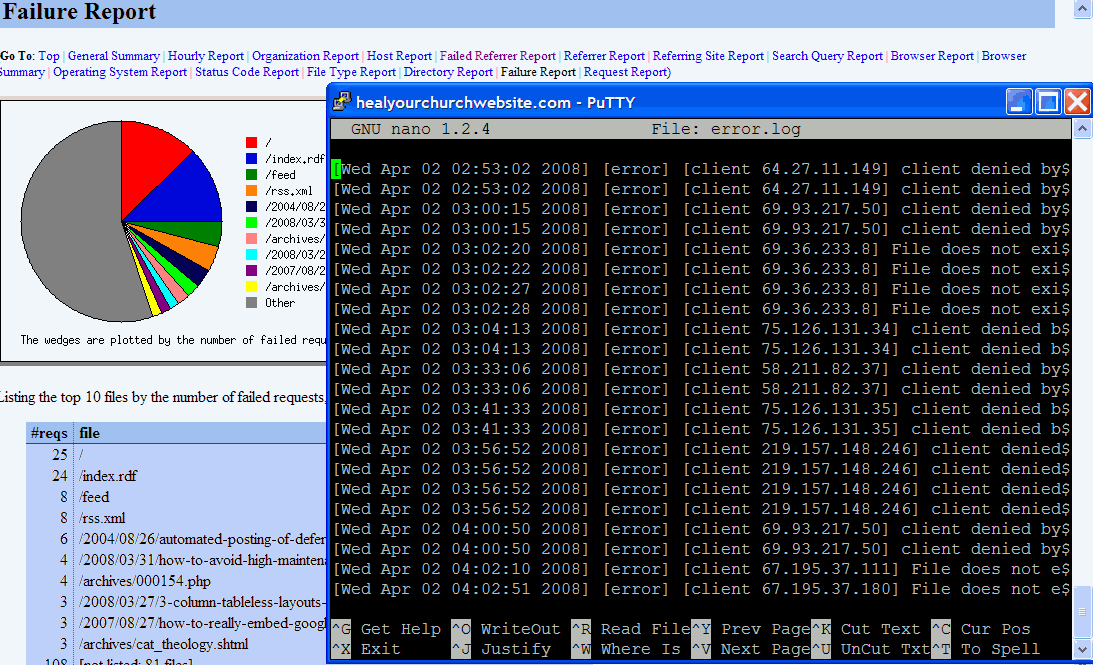
     Sample of error logs and stats screensWith more church webmasters taking advantage of free, one-click installs (e.g. WordPress, Drupal, etc …) provided by inexpensive web hosting solutions, I figure it is time to provide a quick tutorial on how to harvest useful operational, user and security information the error logs using a variety of commands already at your disposal – free.

    I have error logs” some ask? To which my response is: “Probably, did you ask your host provider?

    Once you do find your error log file(s) – and most reputable hosts do provide them, usually through whatever host management application they provide (e.g. CPanel, Plesk, etc …) – then it’s time to answer the not asked often enough question “what do I do with them?

    Below is ny semi-definitive, and most certainly emphatic response:

    Resolve 404 errors

    404 is an HTTP response by your website’s server to a user-browser request to a file not found. This information is tracked in your access logs, but usually and often is included in your error logs.

    Here is why this is important to you – reducing 404 errors:

    • reduces user frustration;
    • points out bugs in your configuration;
    • saves you gobs and gobs of disk space;
    • points out potential vulnerabilities; and
    • once fixed, improves available user bandwidth.

    First thing you need to do is figure out how your error log works, and what type of verbose messages it may or may not offer.

    Then you need to make sure you have enough SSH access (e.g. via tools like Putty) to run the Linux commands grep, egrep, tail, more and perl against your error logs.

    Short digression: Yes folks, for today’s lesson I’m assuming you are hosting on some form of a *nix platform – though one can actually perform the following functions on a Windows-based machine applying command line UnxUtils against a long file either on a server or FTP’d to your home computer.

    Getting back to today’s lesson, here’s a simple example of what command-line I would enter if I wanted to see the last 50 lines of my error log:

    tail -50 error.log

    This quickly gives me insight on the type of error messages available. For the ubiquitous 404 error – which in my world is recorded in the error log file in plain English as “File does not exist” … your mileage will likely vary. With this key phrase in mind, I can now enter the command:

    grep "File does not exist" -i error_log

    Parsing logs into human-readable columns

    Problem is, I probably get more information than I want. What I’m simply after is which IP is getting the error, how often, and on what page request. For that, I “pipe” the output from the “grep” command through Perl – which in turn parses the results by spaces.

    grep "File does not exist" -i error_log | perl -l -a -n -e 'print $F[7]," ",$F[12]'

    Counting the spaces, the IP address in my logs hits at position 7, the errant file at column 12. You’ll likely have to figit with these to get it to produce the results you’re interested in.

    Once you do, my suggestion is directing these results into a temporary file you can visit for later use. For example:

    grep "File does not exist" -i error_log | perl -l -a -n -e 'print $F[7]," ",$F[12]' > 404errors.05mar08.txt

    Once you see where the errors are occurring, usually its just a matter of creating a more comprehensive 404 request manager, and/or replacing a file that got accidentally deleted.

    Excluding certain entries

    One last trick – let’s say you’ve fixed two of your errant files, and now want to see what remains in your error log.

    Try this one on for size:

    grep "File does not exist" -i error_log | egrep "\/(file1\.html|file2\.png)" -i -v | perl -l -a -n -e 'print $F[7]," ",$F[12]' > 404errors.05mar08.txt

    Note that I used egrep instead of grep, the ‘e’ standing for regular ‘e’xpressions, which when coupled with the “exclude” operator of ‘-v’, provides us with a list of errant files excluding those you just fixed.

    Closing ‘args’

    I realize that this may sound like ‘ancient geek’ to some. If that’s the case, then my advice is ask your hosting provider what type of error stats may be available through a pre-packaged application that many hosts provide such as “awstats” and/or “webalizer.” They don’t provide the ‘gory details’ one gets with the command line options above, but it’s good enough.

    Yet for those who dare, there are additional benefits to learning how to parse your own error logs – for example, scheduling the above commands (that pipe into a file) in your cron table so you can quickly identify broken files and/or interesting inquiries from bad boys using a variety of anonymous proxy services and/or browsers in an attempt to set-up my blog as their own personal spam-bay.

    You can also save money, support calls, and/or bandwidth by identifying missing pages, images and other fixable omissions.

    For them, I have some .htaccess hacks awaiting them based on the useful input they provided me via my personally parsed error log.

  • Hyperlink Bible References using Scripturizer 1.3

    After almost a year of people emailing me and leaving comments, I’ve finally made the time to update my Scripturizer Perl Module. The changes aren’t big, but they provide dramatic relief to a series of annoyances that have encumbered some of you from adding more Scripture references to your blogs, church websites and other electronically distributed information. I apologize for taking so long to get around to such an important issue.

    Addition of Abbreviations:

    I think a comment by Werner Peters (no relation) on Rob Hulson’s blog sums up the need for this addition best when he writes:

    “It gets a little tedious writing out Deuteronomy every time!”

    Yeah, you’ve said a mouth full. So I’ve added various abbreviations to the new and improved version. I’ve done so a more hard-coded format than I like, but the regular expressions are complex enough. I want a novice to be able to look at the existing expressions for Books in the Bible and add or alter their own (expressions) as they need.

    This was a painstaking process I automated to some degree with some Perl to split book names after the first three characters, then again at the fourth or fifth character depending on the length and vowel placement. I then went through each of the expressions and added or subtracted based upon a list of common Bible queries over at the ESV Bible. Many thanks to Stephen Smith for directing my attention to this data, it was incredibly helpful!

    Finally, I took care of a small handful of typos, involving pluralization. I still need to write a “mop-up” option to weed-out typos such as “revalations” and “mathew.”

    Eliminate the addition of a space before non-white space bug.

    This bug is exceptionally annoying to those who like to encapsulate their scripture references between brackets or parenthesis, such as (1 John 1:9). So annoying that back last August, Jason Rust left a comment on my blog with a fix. A fix later tried and tested and nicely documented by Joseph Markey.

    Essentially, the bug was introduced when evaluating the space between a volume reference, e.g. 1 John 1:9, which in turn put a space in front of a non-volume reference such as John 1:9. The bug occurred when the character directly before the non-volume number scripture reference was anything other than a space.

    What the fix does is it pushes the evaluation for the space into a variable, then pushes it in front of the hyperlink. An approach that works much better than a hard-coded space as nothing before the reference is then accurately rendered as nothing just before the hyperlink.

    Eliminate the ‘c’ in the gcex modifier in the regular expression.

    This regular expression mode modifier did nothing in this context, except possibily eat up CPU and sometimes throw errors in the latest version of Perl.

    ESV Bible flip-flop

    The great people at the ESV Bible have been so helpful and responsive in the past, I figured why not say thanks in the form of directing those who select the English Standard Version option to the ESV online Bible website.

    In MovableType, that would be <$MTBodyEntry scripturize=”ESV”$>

    Using Scripturizer as a Perl Module, that would be print scripturize(”Phil. 4:6-7″, “ESV”).

    XHTML compliant hyperlinks

    Ampersands are now represented as &amp;

    Usage Notes

    Well, this is sorta a no-brainer. For those of you using the MovableType Scripturizer plug-in, leave the file /plugins/Scripturizer.pl alone.

    Replace the file /extlib/Sermonizer/Scripture.pm with the referenced code below. That should be it, but first make a backup of the old one just in case.

    Here is where I have it set-up on my PC for general purposes using ActiveState’s Perl Dev Kit: c:\perl\site\lib\Sermonizer\Scripturizer.pm.

    Future Iterations

    That’s pretty much it. If you can think of anything else, let me know and we’ll see about adding it.

    Otherwise, I’d like to work on something else Stephen Smith of ESV sent me, a routine that fetches a snippet via their webservice. His code works but I have some MT centric things I want to tackle when slicing-n-dicing an XML stream of Matthew 5. That and I feel a full-blown ESV.pm module coming on. Well, Stephen has already created one, but I’ve got these ideas … and this compiler … well, you get the picture.

    There is also a much needed death-blow to typos method subroutine that needs to be written. The question is, do I write it into the same pass, or do I run first a clean-up pass filter, then scripturize? Any thoughts would be appreciated.

    Again, thanks to everyone for their input. I couldn’t have done any of this without your valuable input. Even if I could, it wouldn’t have been as much fun.

    Download the PM … Sermonizer::Scripturizer.pm

    view it as text: Sermonizer::Scripturizer.pm

    Find a bug? Have a suggestion? Leave a comment. We’ll do our best to see it gets taken care of … quickly. Get it to me in the next couple of days and I’ll try to add it as an update to this article.