Category: Code-Snippets

  • find-a-bot.sh – a nice little script to ID bots bugging your website site

    a nice little script to ID bots bugging your websiteOriginally published on May 30, 2008, made some modifications & bumped it up in the display queue.

    Already demonstrating earlier this week how to block spambots and rogue spiders. Today I’m completing the lesson with a nice little bash script sample that can help you identify some of these non-browser ‘candidates’ by parsing your access logs and placing the results in an easy-to-read text file.

    In other words, this script will selectively find most non-browser user agents that appear in your access logs like this:

    24.190.239.220 - - [29/May/2008:05:16:19 -0700] "GET /about HTTP/1.1" 200 628 "-" "Java/1.6.0_06"
    79.71.205.134 - - [29/May/2008:00:56:34 -0700] "GET / HTTP/1.1" 200 12888 "-" "Site Sniper Pro"

    And turns it into a slightly saner and sorted output like this:

    24.190.239.220 [29/May/2008:05:16:19 "Java/1.6.0_06"
    79.71.205.134 [29/May/2008:00:56:34 "Site Sniper Pro"

    Here is what your bash script might look like on a site running WordPress on shared host like DreamHost … I’ll explain some of the mechanics afterwards:

    #!/bin/bash
    #
    # step 1 - modify these so you get paths like this:
    #   /home/YOURROOT/YOURDOMAIN.coM/...
    #
    myroot="YOURROOT"
    mydomain="YOURDOMAIN.COM"
    
    #
    # step 2 - leave alone if these days & formats work for you:
    #
    TERM=linux
    export TERM
    tdy=`date +%d%b%y`
    ydy=`date -d '1 day ago' +%Y-%m-%d`
    dby=`date -d '7 day ago' +%Y-%m-%d`
    logfile="access.log.$ydy"
    
    #
    # step 3 - modify if you're using something other
    #           than  WordPress on DreamHost
    #
    outfile="/home/$myroot/$mydomain/findabot"
    logpath="/home/$myroot/logs/$mydomain/http/"
    csspath="/home/$myroot/$mydomain/wp-content"
    
    #
    # step 4 - mother of all parsing statements, parse to taste
    #	(note this version DOES sort)
    #
    # 	remember \ at the very end of line equals
    #	bash line continuation of a command set
    #
    grep "$csspath" -v $logpath$logfile | \
      egrep " \"(Mozilla|Opera)\/[0-9]| \"BlackBerry[0-9]{4}" -v | \
      perl -l -a -n -e 'print $F[0]," ",$F[3]," ",$F[11]," ",$F[12]," ",$F[13]' | \
      sort -n > $outfile/$ydy.txt
    
    #
    # step 5 - maintain a manageable archive
    #
    if [ -e $outfile/$dby.txt ]; then
    	mv -f $outfile/$dby.txt $outfile/bak.txt
    fi
    

    Okay, step 1 basically means you login to your site either SSH or even FTP and before navigating anywhere, issue the “pwd” command so you can determine your YOURROOT and YOURDOMAIN (though the latter may likely be your website’s url).

    Step 2 is how we get date stamps for our input and output files. I found a nice simple example of date variable formatting of these over on an ExpressionEngine manual – but they’ll work in your bash script just fine.

    Also, that line containing “7 day ago” can be modified to indicate how many days worth of logs you want to keep active. Similarly, the prior line containing “1 day ago” means you want to parse yesterday’s logs.

    Step 3 is basically how I use variables to define file and directory paths based on what I coded for steps 1 and 2.

    Step 4 combines all the elements from the above steps and taking a page out of my April 2nd article entitled ‘How to quickly check your error logs for oddities‘ issues a consecutive stream of grep and/or egrep commands.

    Sometimes leveraging the ‘-v’ command to exclude elements, most noteably when I’m excluding known user agent strings for browsers.

    This done, a bit of PERL command line magic is used to parse out the fields we want, where afterwards the selected data is sorted and piped into the output file defined in step 3.

    Step 5 takes into account that logs can get big, so this is where we manage an archive … based on step 2 … for 7 days worth of entries.

    find-a-bot gets into the bits and bytes of web site bottageIf you’re not familiar with creating bash scripts, you may encounter situations where you need to “chmod” or even “chown” the file to get it to work.

    The next step – though not documented above – is to test the script and when you’re sure it’s working, modify your crontab file so your batch runs every night, like say 2:15 AM while you and everyone else are sleeping. Here’s what my crontab entry looks like:

    15 2 * * * /home/YOURROOT/find-a-bot.sh > /dev/null

    I’ve provided a .txt version of the file you can simply download from here.

    Moreover, I’ve created a slightly more complex version to download of the above for use on a system running a something like vBulletin on a root or virtual private server operating with Fedora or RedHat.

    The point is, while the above appears a bit complex, I can assure you it’s worth running as it can help you quickly discern over the course of a few days:

    • how often and how hard spambots are sniffing your system
    • how much of your bandwidth is consumed by feed readers versus browsers
    • which feed readers are hammering away at your site, ignoring your <skiphours /> and/or <skipdays /> data
    • how much bandwidth you might save by exporting your sermon’s RSS feeds to a service like FeedBurner
    • what spiders are ignoring your robots.txt file
    • tips on unusual visitors from interesting places from unique user agents
    • whether or not some of the comment spam is via “Mozilla-like”agents who botch their user agent string
    • how many of your visitors are infected with spyware
    • how many of your visitors are trying to hide their tracks by visiting you with an anonymous proxy firing blank user agent strings
    • how many spamblogs are leaching your compelling content

    Like I said, it will require just a little bash script know how, so with that, I leave you with these tutorials:

    Oh and if you’re nice and leave a comment, I might even email you a link to my own archive of greatest bot hits over the past few days.

    Especially if you share your own scripting recipes for spotting bots.

  • What to do when your Twitter Account gets Compromised

    Despite employing strong passwords that I change regularly, despite deleting unsolicited Direct Messages (DM) and mentions with links to unknown destinations, a simple “fat finger faux pas” event lead to me granting a 3rd party Twitter application permission to spam my followers. For that I apologize — and as part of my penance, have provided some useful advice, images and even a script to help you remedy that situation if you should ever similarly fall victim so such malware.What to do when your Twitter account gets hacked

    I woke up a little after 1:30AM last night because I though I had heard some racoons helping themselves to my  trash can as if it were a salad bar. Once that venture into suburban sanitation security was resolved, I checked my Samsung Droid Charge for any incoming notifications.  One that caught my attention read:

    Strange link via DM from you just now.

    As I dug in, I realized that my Twitter Followers were being sent a DM with a link to a third party Twitter Application, which when clicked, would begin the process of similarly turning their Twitter account into a spam-sending zombie.

    First thing first, I read the instructions on Twitter’s help page entitled “My Account Has Been Compromised, ” which advised me to:

    1. Change your password (go ahead, make it  a strong password)
    2. Revoke connections (to any 3rd party application you think suspicious &/or are no longer used)
    3. Update your new password in your trusted third-party applications

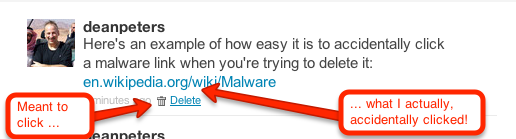
    Which I did immediately. I then went into Twitter and began to manually delete the messages the pusilanimous 3rd party program had sent. It wasn’t long into this tedious process that I realized “… this is how I got hacked, the malware link is WAY too close to the delete link.”  I’ve attached a screenshot of a test DM to demonstrate the usability issue I’m trying to describe:

    How the Twitter delete DM links can sometimes be too close to a malware link

    A bit of context, earlier in the evening while watching the 1st quarter of the Packers/Falcon’s game, I received an obvious malware DM. I pulled up Twitter in my browser on my Droid rather than the mobile App because there’s less keystrokes to deleting such conversations. Unfortunately, I clicked the Malware link. I remember that happened because I quickly hit the back key and then deleted — not thinking anything would happen because of my miscue.

    I was wrong. Later, sometime during the 4th quarter while searching stats on the Pack’s stunning 2nd half comeback, I saw on my little Droid browser a page that looked like Twitter, asking me to log back in. I was busy with the game, I’d seen Twitter do this before. What I didn’t see that the link was  actually pointing to a misspelled site: Twittler.com!

    So despite all my talk about strong passwords, ignoring unsolicited candy from strangers, and other such stuff, I granted a 3rd party application permission to spam the h-e-double-toothpicks out of my followers. Worse, just about the time I was through deleting all the rogue messages, I received another communique that reminded me that followers who get email notifications of DMs were still going to see the link.

    So at about 2:45AM, I set out to write a script that would send DM notifications to all my Twitter Friends — technically, those individuals of whom I follow, who also follow me. I won’t go into too much gory detail, other than the resulting replies indicated grateful followers, who while suspicious, were glad to get the personalized Direct Message warning from me.

    I chose PERL, because while other languages may be better for long term projects, I knew I could field a solution within an hour and a half by taking advantage of the Net::Twitter module provided at the CPAN library; along with a fresh set of API consumer and access from the Twitter Developer’s page.

    I call this script “DM_mea_culprit.pl,” and since it can be used to send a bulk messages to all your Twitter followers, please resist temptation and limit its use it for good:

    #!/usr/bin/perl
    #
    # Summary:
    # --------------------------------------------
    # Sends a Direct Message to Friends - those people on Twitter
    # whom I follow who also follow me
    #
    # Arguments:
    # --------------------------------------------
    # none yet, we'll get that done on the next version
    #
    # Example Use:
    # ---------------------------------------------
    # perl DM_mea_culprit.pl > run01.log.txt
    
    use Net::Twitter;
    use Dumper;
    
    # NOTE: you will need to get consumer keys and access tokens from the
    # Twitter Development Center: https://dev.twitter.com/start
    my $nt = Net::Twitter->new(
    traits => [qw/API::REST OAuth/],
    consumer_key => $YOUR_CONSUMER_KEY,
    consumer_secret => $YOUR_CONSUMER_SECRET,
    access_token => $YOUR_ACCESS_TOKEN,
    access_token_secret => $YOUR_ACCESS_TOKEN_SECRET,
    );
    
    # this information is useful to log at the beinning of the script
    # .. it includes how many more messages you can send w/in the hour
    my $ratelimit = $nt->rate_limit_status();
    print Dumper($ratelimit);
    
    # construct the outgoing direct message
    my $omsg = "please do NOT open any URL you may have received from me last night as a DM. It was malware.";
    
    # get all the ID's of people I follow
    my @ids;
    for ( my $cursor = -1, my $r; $cursor; $cursor = $r->{next_cursor} ) {
    # for a larger net, consider followers_ids()
    $r = $nt->friends_ids({ cursor => $cursor });
    push @ids, @{ $r->{ids} };
    }
    
    # walk through all the IDs
    foreach my $id (@ids) {
    if($id) {
    
    # get an array that describes the friendship
    my $friend = $nt->lookup_friendships({ user_id => $id });
    
    # get their screen name
    my $screenname = $friend->[0]->{"screen_name"};
    
    # see how you're connected to this friend
    my $connections = $friend->[0]->{"connections"};
    
    # important -- do they follow you?
    my $isfollowedby = $connections->[1];
    
    if($isfollowedby) {
    my $dmsg = "\@$screenname, $omsg"; # personalize the DM
    my $smsg = $nt->new_direct_message($id, $dmsg); # send the DM
    if($smsg) {
    print "message '$dmsg' successfully sent to #ID".$id."\n";
    } else {
    print "WRN:".$id."\t@".$screenname."\texperienced a message fail\n";
    }
    sleep (2); # don't overrun Twitter
    }
    sleep(3); # don't get blacklisted
    }
    }
    
    # Now send out a generalized message to the peeps;
    my $res = $nt->update({ status => "TO MY FOLLOWERS: $omsg" });
    
    # last bit of logging
    print "This work is done\n";
    exit 1;
    

    All that said,  here are some things I’m doing to do moving forward to avoid such instances.

    1. continue to change my password periodically, using something very strong;
    2. periodically review my third-party application connections, removing anything that looks suspicious and/or is no longer in use;
    3. always use the Twitter Mobile App to delete DMs with bad looking URLs when on my Droid smartphone;
    4. take a harder look at the URL when asked to log back into Twitter (or Facebook for that matter);
    5. perfect the above script — adding logic to delete spammy DM’s while sending out the warning; and
    6. being the Social Media API junkie that I am, perhaps re-write this in Python.

    Please feel free to add your recommendations to the list above — and again — apologies to my Twitter followers for the hassle.

  • Fun with the Twitter Search API and jQuery

    During my job search last year, I admitted that “yeah, I’m a bit of an API junkie.” Anyone whose followed this site since 2002 probably has gone blind once or twice reading posts about SOAP, XML-RPC, RSS feed and other such programmer protocols and interfaces.

    So why should anyone be surprised that today I’m providing a quick how-to code snippet of some fun I’m having with the Twitter Search API, REST, jQuery and jSON?

    YES, I know I need to get back into providing posts about content management,  effective social media strategies and web campaigns … but for today … please indulge me with one more trip into the land of code.

    Some Context

    In the process of writing some WordPress plugins leveraging the Facebook API, I thought “why not twitter?

    However, there are already a multitude of plugins and widgets out there that’ll show my profile.  So I turned my eyes to Twitter Search.

    My first thought was to simply write this all up using not much else but the jQuery.getJSON() method.  However, this approach doesn’t lend itself well to caching – which in turn would lead to some of you with busy sites getting your widgets blacklisted by Twitter as <a href=”http://apiwiki.twitter.com/Rate-limiting” title=”Twitter API Wiki – Rate Limiting”>their default rate limit</a> for calls to the REST API is 150 requests per hour.

    So now I’m working on a PHP solution inspired in large part by Arron Jorbin’s post “More Twitter Shortcodes for WordPress.” Must read for anyone working with feeds or APIs in the WordPress arena.

    Hey, so where’s the jQuery & jSON?

    All that context aside, I did successfully write a short snippet that used jQuery to call the RESTFul Twitter Search API and then parses the jSON into a dynamic display.

    I did this in part because while I will employ some form of PHP or  Perl to cache the Twitter Search, I still might employ jQuery as the rendering mechanism for said cache. Here’s my test code so far:

    /* a counter outside the context of setCountdown() */
    var seconds2go = 0;
    
    /*
     * the method that sets the visual display of the countdown timer,
     * and triggers getTweet after 2 minutes
     */
    var setCountdown = function() {
      seconds2go--;
      if(seconds2go > 0) {
        $("#countdown").html("Seconds until the next refresh:' +
      ' <span>" + seconds2go + "</span>");
      } else {
        $("#countdown").html("Seconds until the next refresh:' +
      ' <span>0</span>");
        getTweet();
        seconds2go = 120;
      }
    }
    
    /*
     * the method goes out to the Titter A.P.I,
     * then parses the jSON block into the display
     */
    var getTweet = function() {
    
      /* set everything up */
      var url="http://search.twitter.com/search.json" +
           "?rpp=5&callback=?&q=";
      var query = escape( query=$("#twittersearch").val() );
      var display = '<div class="tweetDisplayContainer error">' +
           'no records found</div>';
      var urirex = /(https?):\/\/+([\w\d:#@%\/;$()~_?\+-=\\\.&]*)/g;
      var hashrex = /\#+([\w\d:#@%/;$()~_?\+-=\\\.&]*)/g;
      var thashuri = "http://search.twitter.com/search?q=%23";
      $("#twitterresults").html('');
    
      /*
       * A.J.A.X. happens here -> go get the data, then parse it
       */
      $.getJSON(url+query,function(json){
      $("#twitterresults").html('<h4><a class="searchlink" href="' +
      url.replace('search\.json','search')+query +
      '" title="see the search query via Twitter">Testing: ' +
      url+query + '</a></h4>');
      if(json) {
        display = '<div class="tweetsContainer">' +
      '<dl class="tweets clearfix">';
        $.each(json.results,function(i,tweet){
          ttext = tweet.text.replace(urirex,
      '<a href="$1://$2" title="">$2</a>');
          ttext = ttext.replace(hashrex,
      '<a href="' + thashuri  + '$1" title="">#$1</a>');
          display +=  '<dt class="tweet' + i + '">' +
                '<img src="' + tweet.profile_image_url + '"  />' +
              '</dt>' +
              '<dd class="tweet' + i + '">' +
                ttext + ' <strong>via:</strong>' +
                '<a href="http://twitter.com/' + tweet.from_user +
                '" title="tweets by ' + tweet.from_user +
                '">@' + tweet.from_user + '</a>'
              '</dd>';
            });
        display += '</dl></div>';
      }
        $("#twitterresults").append(display);
    
      });
    }
    
    /*
     * this is where we kick-it all off,
     * assumes seconds2go = 0 initially
     */
    setInterval(setCountdown, 1000);
    

    As you can see, the most difficult part was getting it all to fit in a readable format on this blog! Well, that and some additional fun with regular expressions.

    Well that and what you don’t see in the code are two html elements:

    <h2 id="countdown">Seconds until the next refresh: <span>120</span></h2>
    
    <input type="hidden" id="twittersearch" value="deanpeters #smm" />
    
    <div id="twitterresults">no results yet</div>
    

    Todo: I’m thinking the above script could use a bit of animation easing or some other effect so we don’t simply “flash” new results at the user. It also needs to be objectified and wrapped-up as a plugin. More on that as I work on the widget/plugin.

    Demo Stuff

    I did create a demo page – it’ s not pretty, but it effectively shows how to get it done. I’ll craft up some CSS for it later.

    It’s basically built off a search of  deanpeters  #smm as pictured below:

    twitter search criteria for jQuery test

    I’ve also created a .txt version of the file if you’re interested.

    Additional Reading

    In the meantime, I though I’d list some of the sites I visited while approaching this exercise. Some good people providing some good examples:

    FYI

    Thanks for all the emails and retweets of late. Good stuff!

  • Using Perl’s Net::Twitter to Harvest Keyword Searches

    So you’ve decided to dive into social media marketing on behalf of your church and/or charitable organization.

    In fact, you’ve been wisely leveraging bit.ly with Twitter or ow.ly with HootSuite to track and measure your outbound links — but you find yourself in need a more ‘industrial strength‘ means of tracking who is saying what about your organization or an upcoming event.

    You also want to speed up your WordPress blog as it’s been gagging when your Twitter RSS feed goes all 503 on you because Ashton Kutcher tweeted about his toenail clippings.

    Recipe for Success

    As I mentioned in my post last Tuesday entitled ‘Strategy vs. Tactics and your Social Media Activities ,’ I’ve been playing around with some of the cool social networking tools one can find in the CPAN library.

    Today I want to provide a quick snippet on how to use the Net::Twitter to write a simple PERL program to harvest a search.

    To do this, it mean installing the Net::Twitter library. You’ll likely need root or sudo privileges to make this happen. If you don’t know what root or sudo means, then you’ll want to contact your hosting provider.

    That said, once you get it installed, the next step is to go to the Twitter Search page and create an advanced search. From the resulting query string should give you all the parameters you need, for example:

    Based on the above example, I created the following script by using the nano editor for a file called ‘eastertweets.pl‘:

    #!/usr/bin/perl
    use Net::Twitter;
    use Net::Twitter::Search;
    use Scalar::Util 'blessed';
    # Just the Search API; exceptions thrown on error
    $nt = Net::Twitter->new(traits => [qw/API::Search/]);
    eval {
       # Parameters: q, callback, lang, rpp, page, since_id, geocode, show_user
       my $r = $nt->search({
          q=>"\"easter service\" OR \"sunrise service\"",
          lang=>"en",
          geocode=>"35.769804,-78.781622,40mi",
          rpp=>50,
          since=>"2010-03-21"
       });
       for my $status ( @{$r->{results}} ) {
          print "\@$status->{from_user}";
          print "\t$status->{created_at}\n";
          print "\t\t$status->{text}\n";
          print "-----------------------------------------------------\n";
       }
    };
    if ( my $err = $@ ) {
       die $@ unless blessed $err &amp;&amp; $err->isa('Net::Twitter::Error');
       warn "HTTP Response Code: ", $err->code, "\n",
       "HTTP Message......: ", $err->message, "\n",
       "Twitter error.....: ", $err->error, "\n";
    }


    Once I created the file, it was simply a matter of modifying it to execute, then calling it:

    chmod a+x eastertweets.pl
    $HOME/eastertweets.pl

    So Why Bother?

    Now this approach by itself is a lot of work for little return. However, here are some things you might want to do with the sample above that would provide some big return value:

    1. feed this into a SQL database history via Perl DBI;
    2. create comma separated values and pipe it into a running log file;
    3. aggregate the returns with other searches into a single RSS file on your server for both the sake of speed and feeding localized dashboards;
    4. grep the returns for other key words, sending email notifications on hot items, while deleting those spammy items that make your feed so noisy;
    5. create a RESTFul web service that dynamically feeds your WordPress blog of select queries using Ajax via jQuery.

    The point is, once the data is captured, you can pretty much do anything you want with it programatically.

    For me, I’m thinking it might be fun to grab user IDs and feed their demographic information into some sort of analytics engine; or at least have some fun with Google Maps.

    Anyway, enjoy the example. If you expand on it, don’t forget to come back and provide a link. I’d be interested to see how this snippet evolves.

  • The Facebook Like Button Plugin for WordPress

    Facebook rocked the internet yesterday with 5 new plugins, one of which is an API for the Facebook Like Button. After reading about it and playing a bit with the Facebook’s Like Button generator, I decided what’s needed is a WordPress plugin that allows folks to easily configure the look-and-feel of the Facebook Like Button, and then automatically add it the beginning and/or the end of their posts.

    Update 26-Apr-10

    FYI, I just released version  0.1 of the The Facebook Activity Widget Plugin for WordPress – yet another useful (and different) WordPress plugin for displaying Facebook Social plugins on your website.

    Update 25-Apr-10

    Version 0.4 just got released – it now has a preview feature built into the administrator panel … and I’m starting to get translation .po & .mo files from abroad (thanks!-). It’s also now being distributed via the WordPress Plugin Repository.

    Update 24-Apr-10

    Version 0.2 is released as of Saturday, April 24, 2010 7:14 Eastern Standard Time.

    Also after some excellent email and FB message feedback from some early adopters, you can now also decide whether or not you want the FaceBook Like Button to appear on the top and/or bottom of individual pages, individual posts and/or your front page.

    Installation & Use

    I also wanted to keep it simple, so here’s how it works — using the standard WordPress plugin installation process:

    1. Upload the ‘fblikebutton.zip’ file to the `/wp-content/plugins/` directory using wget, curl of ftp.
    2. ‘unzip’ the ‘fblikebutton.zip’ which will create the folder to the directory `/wp-content/plugins/fblikebutton`
    3. Activate the plugin through the ‘Plugins’ menu in WordPress
    4. Configure the plugin through ‘FBLikeButton’ submenu in the the ‘Settings’ section of the WordPress admin menu.
    5. Modify the fields to choice and save.

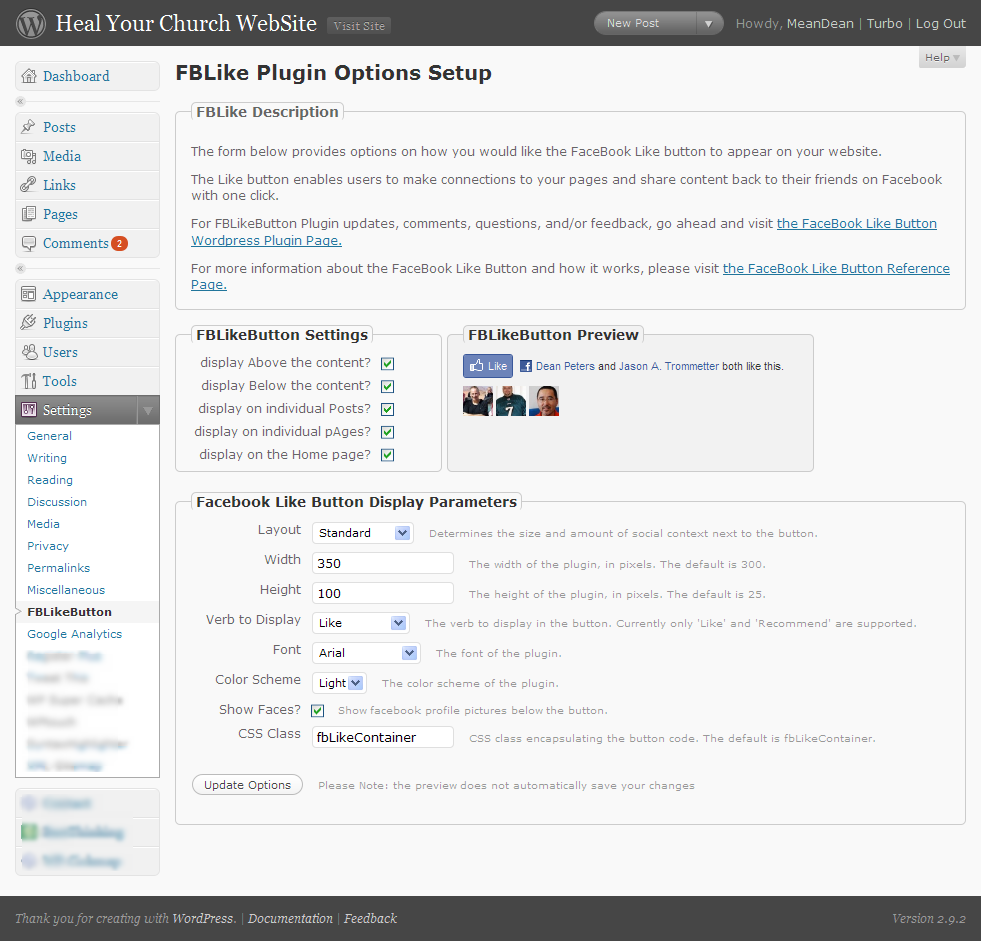
    Here’s a screen shot below of the administrator screen (you’ll want to click on it to see it full size):

    Screenshot of the FBLikeButton Admin Panel - now with preview

    Here’s how the FaceBook Like button appears on the bottom of this post:

    Screenshot of the FBLikeButton after fabulous formatting

    This being being version 0.1, you can bet your sweet bippee there’s more to come. Still, I wanted to get this out to the WordPress community as fast as possible.

    A bit more about the FaceBook Like Button

    What’s nice about the Facebook Like button is that no login to your site is required. Even if you’ve never visited HealYourChurchWebsite.com before, they can get social context starting with their very first visit.

    If you’re logged into FaceBook, then you can see which of your friends like a site — without the site knowing anything about you. Pretty neat, huh?

    Download It

    Also, I’m currently in the process of setting getting established with the WordPress SVN  and everything else that goes with publishing an official WordPress plugin.

    Until then, click here to download the latest fblikebutton, from the WordPress Plugin repository keeping in mind it is version 0.1 0.2 – so expect more to come!

    Download the FaceBook Like Button Plugin for WordPress

    Shout Outs and Thanks

    A shout–out of thanks for the immediate feedback goes out to Benjain, Julien, Tim, Jason, and Dave.

    Additional Reading

    FYI

    Oh, and hey, don’t forget to click the FaceBook Like Button for this post … I’d appreciate it.

  • ip2Country.pl – A fast little script to bulk id IPs by country

    ip2Country.pl - a fast little PERL script to bulk identify IPs by countryYes, I know, all cool programmers use Python these days – but to this old-school programmer, PERL is to my antiquated PC what GWBasic was to first computer at work back in 1983. That is a nice little tool to get things done, like identify a list of IP addresses by country.

    Here’s the situation, I’ve been getting a lot of incoming spambots attempting to create accounts and post comments both here on HYCW and a few other sites I help manage. The Akismet spam filtering service catches all of it – but there’s still at times a huge draw on bandwidth, CPU and other resources when these bots hit.

    So from time to time, I harvest the IP addresses from the thwarted ne’er-do-well’s failed attempts via my user registration table and/or Apache logs and then add them to the firewalls, .htaccess file and/or application IP ban lists of these various sites – except for those IPs incoming from countries where both the languages and laws give me the ability to email the abuse administrator.

    Moreover, by excluding IPs from countries like the US, Canada, etc … from my ‘hit list,’ I don’t accidentally banish entire ISPs such as RoadRunner, ComCast or AOL when one of their user’s machines goes z0mbie goes due to some malware.

    So the trick is then to take all the IPs from all the computers with which I’m associated, and drive the list through a simple application that will generate a list of IPs to ban – while excluding IPs whom I can (and do) contact via email at a later time.

    Which is what inspired me to write ip2Country.pl – a fast little PERL script to bulk identify IPs by countries who don’t have IP abuse administrators who care, and generate a bash script to insert the entries into my apf firewall deny_hosts.rules file:

    #!/usr/bin/perl
    #
    # by Dean Peters
    # http://healyourchurchwebsite.com/
    #
    use IP::Country::Fast;
    use Geography::Countries;
    my $reg = IP::Country::Fast->new();
    
    print "#/bin/sh\n";
    print "# -- append firewall --\n";
    while() {
            chomp;
            my $ip = $_;
            my $ip_cntry_abr = $reg->inet_atocc($ip);
            my $ip_cntry_nam = country $ip_cntry_abr;
            next if ($ip_cntry_abr =~ m/US|CA|GB|AU|NZ/i);
            print "/etc/apf/apf -d $ip {mad spammer from $ip_cntry_nam}\n";
    }
    print "# -- restart firewall --\n";
    print "/etc/apf/apf -r\n";
    
    __DATA__
    121.1.29.246
    121.15.200.148
    193.238.213.70
    196.20.7.74
    210.22.83.146
    217.30.244.226
    222.124.200.212
    

    Oh sure, I could be real fancy and write a version that takes command line arguments for individual IP addresses and/or a file of IP addresses … but the point here was to demonstrate how a crufty old tool like PERL can help bulk identify IPs by countries so you can too add them to your firewalls, .htaccess file and/or application IP ban list.

    That said, if you’ve got a Python or even PHP version of the same, leave a comment and share the goods.

    Or you can just preemptively use the online services of Block a Country and be done with it.

  • How I fixed my Windows XP Stop c000021a {Fatal System Error} with Knoppix Linux

    Below are steps describing how I used Knoppix Linux to fix the dreaded Windows XP ‘Error Message: Stop c000021a {Fatal System Error} The Session Manager Initialization System Process…’ failure.

    This morning, when I powered-up my computer at work, my Windows XP-based computer booted blue, noting a file error which in turn kicked off an automatic chkdsk scan/fix of my hard drive. I got some coffee and used my smart phone to address email while all this was going on.

    When the system was done “fixing” the broken files, it rebooted to something I’d never seen before – a blue screen of death with the following ubiquitous message:

    Stop: c000021a {Fatal System Error}
    The Session manager initialization system process terminated unexpectedly with a status of 0xc000026c (0x00000000 0x00000000).
    The system has been shut down.

    After a few bouts with the on/off switch, it was clear, I was dead in the water.

    I walked down the hall to visit the IT guys, together we brought up the Microsoft Knowledgebase file #317189 entitled “Error Message: Stop c000021a {Fatal System Error} The Session Manager Initialization System Process…

    It had fun advice like installing Dr.Watson, running a memory dump and then sifting through the disassembled 0’s and 1’s to figure out what broke. Of course one’s machine would have to boot before that byzantine process was possible – a minor point not considered in said documentation.

    There were some other things about registry files, but again, I can’t get to the the C:\> command line prompt then it doesn’t do me much good.

    I did find on the Messenger Plus! Live Forums advice to run the Windows repair and replace my psapi.dll file with an older version, but again, that’d require getting onto the hard drive – and the only way I knew how to do that at this juncture would be take a route similar to the one I wrote about in 2003 in my post entitled:’Linux-based approach to fixing MSBlaster Worm infection.’

    So after digging through a few drawers and CD stacks, I found a Knoppix CD I had ‘burninated’ back in October for my blogging-tour of Jordan. For those of you who don’t know, Knoppix is a Linux distribution based on Debian GNU/Linux designed to be run directly from a CD / DVD.

    So I popped the Knoppix disk into the CD drive, turned on the power switch and within minutes, my machine was back up and running under Windows XP; though part of me wonders if there’s not an Ubuntu install in store for my aging home computer … but I digress …

    Anyway, I figured it might be helpful to some of you out there if I provides some detailed step on how I fixed my broken Windows operating system with Linux:

    1. Boot up your computer from the CD drive with your latest CD ‘burnination’ of Knoppix.
      • For me, this meant hitting the F12 key on boot up, and instructing the computer to boot from the CD/DVD drive instead of the hard drive.
      • This step also assumes that at some time in the past, you downloaded, burned and tested a Knoppix CD.
    2. At the initial ‘boot:’ prompt, hit enter.
      • You may find you’ll need to boot Knoppix with various startup options to make it work on you particular hardware platform.
      • Hitting the F3 key will show you some of those options. You can also find “cheat codes” online.
    3. Hopefully at this point you’ll see a “Windows-like” desktop known as KDE – and with luck – the hard drive in question will appear represented by an icon at the upper left as mounted and available for use.
    4. Click on the drive icon that contains your Windows operating system. This will open up (and you Linux fans out there, please forgive me for the term I’m about to use) this will open up an “Explorer like” file window as depicted below:
      Heal Your Church Website: saving Windows w/Knoppix screen 1
      I suggest changing the the display to list the files in ‘detail.’
    5. Sort your directory by date in descending order.
    6. Expand both the found.000 (our found.001..n, etc) and your Windows/System32 directories.
    7. View which files the Windows chkdsk moved into the found.000 path as listed below:
      Heal Your Church Website: saving Windows w/Knoppix screen 1
    8. Check for the same file names in the System32 directory – back them up of need be – then copy the files from the found.000 path into the /Windows/System32 directory; overwriting the existing files by the same name.
      • This is a dangerous move and can entirely mess-up your system -do it at yoru own risk.
      • In my case, I would have made backups, but all of them were of a 0 byte filesize, timestamped this morning at the time of the crash.
      • This is a dangerous move and can entirely mess-up your system -do it at yoru own risk.
      • It never hurts to backup files you’re abut to overwrite.
      • This is a dangerous move and can entirely mess-up your system -do it at yoru own risk.
    9. Shutdown Knoppix correctly (don’t be impatient and just pull the plug:-) – remember to remove the CD from the drive when prompted.
    10. Reboot under Windows.

    DISCLAIMER

    : Warning – I do not recommend this course of action. I am merely enumerating the steps I took to fix my computer under my circumstances, configuration and context. Your mileage may vary – as potentially you risk losing everything in following the same above steps.

    Now if you don’t mind, I have some backups and diagnostics to run. After that, time to go ‘burninate‘ a fresher Knoppix CD; you never know when it’ll come in handy.

    – – – § – – –

    MORE GREAT ADVICE:

    – – – § – – –
  • 5 to ways permanently redirect an old church domain name to a new domain name

    It is no sin for a church to change their domain name. However, it is an unspeakable Internet offense if you do not provide visitors – and search engines – with a quick, simple and painless redirect from the old domain to the new. Unfortunately not all church webmasters know even 1 way to avoid said sin, let alone 5; that is until now:

    While I was surfing about for candidates on another topic, I came across the home page for the Vestavia Hills United Methodist Church of Birmingham, AL … or at least what I thought was the home page.

    Actually, I’m thinking it was the old home page, or a home page whose sole purpose is to redirect visitors from vhumc.org to vestaviahillsumc.org – but does so in a way that gets in the way of seekers and search engines alike.

    To that end, I’ve taken the time to demonstrate five different methods of implementing a search engine friendly, permanent redirect from the old domain name to the new – and in most cases, passing along any query string that may be the result of an old bookmark:

    1. mod_rewrite (via .htaccess)
    # The most preferred, but also at time the most difficult of approaches
    # requiring you modify your .htaccess file as follows:
    RewriteEngine On
    RewriteCond %{HTTP_HOST} ^(www.)?vhumc.org$ [NC]
    RewriteRule ^(.*)$ http://vestaviahillsumc.org/$1 [R=301,L]
    2. Perl:
    #!/usr/bin/perl -w
    # some might argue that this is the most difficult method, and
    # I might tend to agree as a n00b might find out that they should NOT
    # delete the blank spaces and line feeds in between the quote {} tags.
    #
    use strict;
    my $q = ($ENV{'QUERY_STRING'}) ? "?".$ENV{'QUERY_STRING'} : "";
    print qq{Status: 301 Moved Permanantly
    Location: http://www.vestaviahillsumc.org/$q\n\n};
    exit;
    3. ASP classic
    ' # yes, I know we live in the age of .NET, but if you note, today's subject
    ' # is redirecting to an .asp kinda host, so it could be the same for their
    ' # old domain.
    < %@ Language=VBScript %>
    < %
    qs = ""
    if(Request.QueryString.Count > 0) qs = "?" & Request.QueryString
    Response.Status="301 Moved Permanently"
    Response.AddHeader "Location", "http://vestaviahillsumc.org/" & qs
    Response.End
    %>
    4. PHP
    < ?php
    // # perhaps the easiest and most reliable solution for most of you out there
    // get querystring - if it exists
    $q = empty($_SERVER['QUERY_STRING']) ? "" : "?".$_SERVER['QUERY_STRING'];
    // Permanent redirection
    header("HTTP/1.1 301 Moved Permanently");
    header("Location: http://vestaviahillsumc.org/".$q);
    exit();
    ?>
    5. JavaScript
    <script type="text/javascript">
    /*
    # I don't prefer this method as most search engines won't get it, still
    # it is sometimes the only solution a limited webmaster can muster on
    # a limited budget and hosting situation.
    #
    # Also note we don't merely assign a value to href, there is a good reason
    # for this explained here:
    # http://andylangton.co.uk/articles/javascript/javascript-redirect-scripts/
    */
    var qs = window.top.location.search.substring(1);
    qs= (isEmpty(qs) ? "" : "?" + qs);/* capture query string */
    location.replace('http://www.vestaviahillsumc.org/' + qs);
    </script>

    As you can see, there’s more than one way to skin the old redirect cat. Of course there is also more than one way to foul this all up, which is why I’m providing you with a list of additional reading references just in case you find you’ve caused irreparable harm to your website and reputation the above examples as is (note, you’ve just been warned with my disclaimer):

    That said, if you’re still pondering which method to employ, here are my rules of thumb regarding which redirect method to use in which order:

    1. If you have shell access and the know-how:
      .htaccess (mod_rewrite)
    2. If you can’t do it .htaccess
      php
    3. if you can’t do it PHP
      Perl
    4. if you can’t do it Perl
      javascript
    5. if you can’t do it Javascript
      meta tag
    6. if you can’t do the meta tag
      hire some help

    Oh and for those of you who note that I didn’t include a “how to redirect using the refresh meta tag” – it’s because one of the objectives in this exercise is to redirect to preserve search engine visibility and ranking. The unfortunate abuse by spammers of the taggery means potentially hiding your lamp beneath a basket due to no fault of your own.

    For more information on how to modify the .htaccess file to redirect domains can be found here:

    Still interested in reading more on the topic of redirecting from old domains to new domains? Want to see where I got and/or vetted some of my solutions?